When the pioneers of automotive speed began searching for ways to make their stock power plants push their creations faster, the quest for a lighter engine with more horsepower was all the rage. At the end of the World War II, using aluminum in technology was at a fever pitch. Foundries casting aluminum were easy to find and welcomed new uses for their services. This opened up the opportunity for the early speed seekers to develop new lighter parts to propel their vehicles to increasing levels of speed.
It took a while, but soon after the aluminum craze became a big hit, people started polishing the material to a high gloss chrome-look appearance, which created “the show look.” Since that time, millions of muscle car builders have dressed up an engine in some form using cast aluminum, billet aluminum and or chrome-plated steel components. These items bring out pride for an engine assembler, and bragging rights for the owner as well. Just ask a guy whose car is under construction to open the hood, and nine times out of 10 his engine will be sano.
In this article we want to pay homage to some of the early speed part manufacturers and some of the new ones who are keeping the look and feel alive, and continuing to give us the right to brag about our muscle cars.

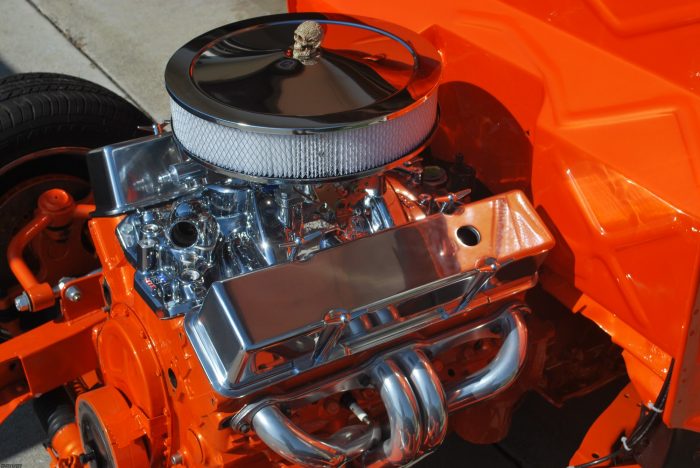
Shown in this photo are some familiar names such as Edelbrock, Hedman Hedders and Mr. Gasket, which are all long-time providers of quality speed parts and finishes.

To begin our dress-up, we’ll install an Edelbrock intake manifold. First we apply a bead of sealant to the front and back lips of the small-block Chevy’s valley. Using a back and forth pattern, squeezing the tube of sealant properly seals the manifold from the vacuum pressure that could escape and cause tuning problems.


Edelbrock provides the proper intake manifold gaskets to match its Performer Series intake manifolds. Seen in the photo, the gaskets are matched to the intake runners just before the manifold is carefully set in place. Be sure and align the bolt holes on the first try; this ensures that the sealant placed in the valley of the engine seals properly and looks clean.

Spectre Performance makes mounting speed parts easy with its premade kits for many engine applications. Items like these wing nut valve cover fasteners also give some favor to the look that we’re going for.


There is the proper way to bolt down an intake manifold: Start the bolt sequence in the middle and work your way outwards. After all of the bolts seem snug, check the torque setting to 25 ft-lbs.


Place the thermostat in the intake manifold before placing the gasket and the chrome housing from Spectre down. Using the provided hardware, bolt it down snugly, but not super tightly. Remember that a steel bolt can strip out the threads of an aluminum part, so take care when you tighten down this part.


Now it’s time to place the carb on top of the manifold. Set the base gasket down before lowering the carb, aligning the holes, and then run the bolts into the manifold. One of the great things about this carb/manifold combo is not just the tuned performance that you can expect, but both items have been treated with Edelbrock’s signature finish called Endrashine. This ultra-modern coating seals the aluminum, protecting it from the elements while maintaining an awesome, bright, polished look. The best part is that it cleans using simple spray-on cleaners and a clean cloth, rather than hours of hard rubbing and dirty paste products.


To complement its carbs, Edelbrock offers this hard fuel line kit with an in-line fuel filter. This beautiful part bolts directly to the side of the carb’s inlet feed port, while snaking under the carb’s linkage where a dash and six fuel fitting awaits to be joined with the feed line from the fuel pump.

Take a look at these wing nut valve cover hold downs from Spectre Performance. Made popular in the ‘60s and ‘70s, these babies were a hit with drag racers that needed to adjust valves between runs. They made it easy to remove the covers without tools, saving time. The crew at Spectre remembers those days, too, which inspired them to reissue this set.


Mr. Gasket’s tall covers were chosen for this engine to give it the look and feel of an early high-lift camshaft that owners had to use for clearance. Installing them is simple, because the gasket and cover are set over the studs provided in the Spectre kit that are threaded in the cylinder head. After the covers are set, the wing nuts are turned down to keep things tight. Paired with the Spectre wing nuts, the valve covers matched period-perfect.

Headman Hedders has been producing tubular-style exhaust manifolds since 1954, and these block-hugger headers are a perfect fit for our project. The 1 5/8-inch tubes join together at a 2 ½-inch collector, allowing more torque and efficiency. To keep things looking good, the mild steel material has been treated with HTC ceramic metallic coating to reduce temperature while maintaining a great look.


Last but not least is Mr. Gasket’s classic round chrome air cleaner. Included in the air cleaner’s box is a plastic spacer that sits between the carb and the bottom of the air cleaner. This part lifts the base of the cleaner up high enough so that it won’t interfere with the carb’s linkage or the tall valve covers. Now that the spacer is in place on top of the carb, it’s time to set the rest of the air cleaner down on top of the spacer where we can move on to the air cleaner stud.


Edelbrock includes a length of all thread with all of its carbs, and because there are hundreds of different air cleaners available that will fit on their carbs, the piece of all thread must be cut to fit. Use a piece of tape to mark where it needs to be cut. After we fit the air cleaner stud, we install this great-looking skull air cleaner nut for some attitude.

Wow, what a difference a few shiny parts can make to an engine! This look is just what we were going for, and the experienced parts manufacturers that we chose made it easy for us to get the right results. Stay tuned as we continue to dress up this engine the old school way.
Edelbrock
Edelbrock.com
Hedman Hedders
Hedman.com
Spectre Performance
Spectreperformance.com
Mr. Gasket
Mrgasket.com