Removable Windshield Wipers for Roadsters: When Rain-X Isn’t Enough
Text and Photos by David Guy
Removable Windshield Wipers for Roadsters: When Rain-X Isn’t Enough
In our opinion, windshield wipers don’t look good on roadsters! Good looking or not, sometimes Ran-X isn’t enough to do the job and wipers are really needed. The “sometimes” is usually on a Sunday afternoon when you are several hundred miles from home, driving in a frog-strangling rain, and you need to be at work on Monday morning. Rain-X is an excellent product and works 98-percent of the time; this removable wiper is for the other 2-percent of the time.
We wanted a removable electric wiper motor that could be installed quickly (e.g.: sitting under an underpass on the interstate) and without using any tools.
We started the project with a Mighty Wiper motor from Pacific Western Design, Inc. (360.385.5493). This roadster has a 2-inch chopped windshield and a folding top with an original-style wooden front header. The main ingredient to this installation is the 16-gauge metal bracket that holds the motor in front of the windshield glass and mounts to the rear of the wooden header. There is a gap of approximately 3/4-inch between the bottom of the header and the top of the windshield frame, which is plenty of clearance for the sheet metal bracket. The motor is unmodified, but we did cover the screw heads with silicone caulk in an attempt to maintain a water-resistant enclosure. The wiper arm is modified to compensate for the motor location.
The bracket was fabricated to keep the motor as close to the glass and as high as possible. Once the location of the mounting holes was transferred to the rear surface of the header, two 3/8-inch holes were drilled and threaded metal inserts were installed. The inserts have a number 10-24 internal thread. The bracket will be secured to the header with number 10-24 thumb screws. The motor shaft, 3/8-inch diameter, protrudes through the bracket and secures with the nuts provided with the motor. We filled the gap between the motor housing and the bracket with silicon caulk. The caulk will help to absorb the rotational torque of the motor.
The wiper arm modification involved removing the blade end fitting from the arm. A small screwdriver was the tool of choice. The fitting was turned over and re-secured to the arm with a pair of pliers to re-crimp the fitting. The arm is adjustable for length. We used the shortest arm available and jockeyed things around until the arm connection was located in the center of the blade. With a 2-inch chopped windshield, there is not much room for a blade.
With the bracket, motor, arm and blade installed, we turned to the electrical portion of the job. The Mighty Wiper has a “park” function, so we followed the directions for hooking up the electric to the motor. We installed an inline switch and a fused connector to plug into the power port, also known as the cigarette lighter.
This entire project is strictly for function not for aesthetics. The two thumb screws mounting the bracket can be removed, the power port plug can be disconnected, and the entire wiper assembly can be stored in the trunk until the next time it is needed. If the Rain-X does the trick and the wiper assembly never comes out of the trunk, it was still time and money well spent. We never know when we might need it.
Pacific Western Design, Inc.
693 Blue Sky Drive
Port Townsend, WA 98368
360.385.5493
www.pacificwesterndesign.com

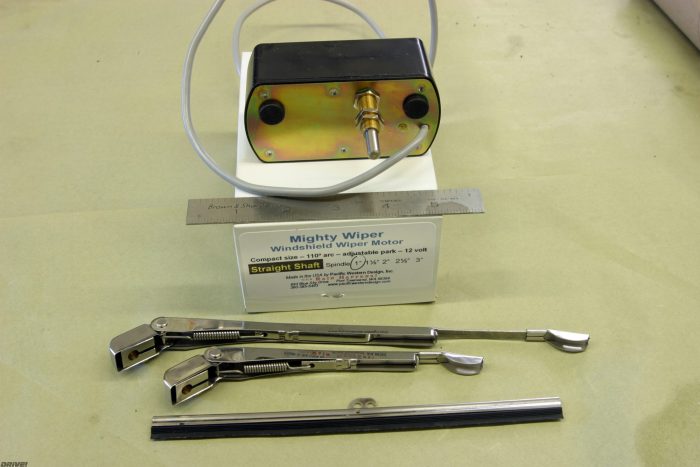
This is the Mighty Wiper motor with a 1-inch shaft. We also got one long and one short wiper arm and one wiper blade.

This is bracket number one fabricated from hot rolled 16-gauge mild steel. The final configuration uses bracket number three as the evolution moves toward a smaller bracket.

A roadster with a 2-inch top chop does not have a large windshield and will not allow the use of a long wiper blade. The masking tape marks where the driver’s line of sight is located.

To locate the wiper motor we laid the wiper coverage area over the driver’s line of sight. The driver’s “eyeball” location is near the top in relation to the wiper area. The vertical edge (top) of the wiper area is the left-right location of the wiper motor shaft.

We’re already up to bracket number two. The 1/4-inch-tall spacers that are tack welded to the front side of the bracket allow clearance for the tack-hideum strip on the backside of the wooden top header.

These are two types of threaded inserts for wood. We used the type on the right, which requires a 3/8-inch diameter hole to be drilled into the wooden top header with a 10-24 internal thread.

We marked the location of the two holes on the wooden header. Using maximum caution, we drilled two 3/8-inch holes with our cordless drill. Be sure you have a positive depth stop on your drill bit! Mistakes here can be very expensive.

Lubricate the outer threads of the insert and thread it into the wood. With an oak header, we needed a friend with a 7/16-inch wrench to turn the screwdriver the last two turns.

We had bent the bracket to 90 degrees on both bends, but needed to back off the lower bend to position the motor mounting surface parallel to the windshield.

The first trial fit left us with approximately 1/8-inch between the motor and the glass. Notice the 1/2-inch space above the motor. Bracket number three will eliminate that gap and raise the motor to maximum height.

With the Mighty Wiper installed it is 3 inches from the end of the threaded brass sleeve to the surface of the glass.

The total height of the windshield is just less than 8 inches. The Mighty Wiper blade is 8 inches, so we know it will need modification.

This is the short arm from Mighty Wiper. It does have some length adjustment. Located below the wiper arm is a piece of solder that has been bent to replicate what is necessary to get the blade to the glass.

The end of the wiper arm is crimped onto the arm’s stainless steel beam.

A little work with a pocket screwdriver and the end is removed. We rotated the end 180 degrees and re-crimped it onto the beam.

First trial fit with the 8-inch blade. When we bent the arm 180 degrees, it necessitated flipping the end on the arm.

The effective length of the arm is now 4 ¼ inches.

We marked the blade for cutting. We made the blade 1/4-inch longer than desired for a little wiggle room. We need the mount to end up in the center of the blade length.

Here are brackets number two and three. Bracket number three raises the motor an additional 3/8-inch and allows us another 3/8-inch of blade length.

The lower corner of the motor is the first point of interference with the blade.

This was the first attempt. Everything fit but the mount is not located in the center of the blade. A phone call to Western Pacific Design got us another blade. The moral of the story, learn from mistakes; measure twice—cut once and plan ahead.

The Mighty Wiper is sealed against moisture, but we sealed the screws with silicone caulk, just for good luck.

We also placed a bead of caulk between the motor and the bracket to help absorb any rotational forces.

The local hardware store provided us with a fused adapter to fit into our power port, also known as the cigarette lighter. We installed the 1-amp fuse that Mighty Wiper includes in its product. Remember that this project is a [i]removable[/i] wiper.

With an S.P.S.T. switch from the hardware store, we followed the instructions to give ourselves a self-parking wiper motor. To protect the wiring/switch connections, we taped the assembly to a 5-inch-long piece of 1/4-inch diameter wooden dowel.

With bracket number three painted and installed and electrical power attached, we used a piece of tape to locate the actual park position. The blade arm clamps to the motor shaft, and the blade can be located wherever its needed.

With the wiper arm installed and the new blade cut and installed, we draped the power cord over the rearview mirror. It’s time for a trial run.

Using our trusty spray bottle to wet the windshield, we turned the wiper motor on and this was the result. Granted it is not a large area of wiped glass, but it is better than no wiped glass at all. A stock height windshield would yield a wiped area approximately 50-percent larger.

Here’s the unit removed from the windshield and bagged up for storage in the trunk.

Before we quit, we made up two thumb screws with lock washers soldered onto them. These screw into the threaded inserts in the wooden header of the top and mount the wiper motor bracket.


When you get tired of Henry Ford’s self-loosening thumb screws that “secure” the top to the windshield stanchions, you can step up to socket head bolts with locknuts. You may want this tool to loosen the lock nuts and socket head bolts. We threw this into the bag with the wiper motor. Everything we need is in that bag and the wiper motor can be installed in minutes.
New title