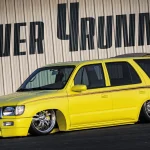
Drive April 17, 2013197272 Plymouth Barracudabodywork
Text and Photos by Tommy Lee Byrd
Article
If you’ve dealt with bodywork or any sort of painting, then you know the trials of doing this work on a regular basis. Problems are common for even the best painters, but knowing how to repair those flaws is the difference between success and failure. Whether it’s something that happens before, during or after the painting process, the man holding the spray gun is usually responsible for fixing it, no matter the severity. In this case, Danny Parton is the painter, and we followed along as he repaired the quarter panel on a ‘72 Plymouth Barracuda.
The car is being restored at Specialty Collision Center in Dayton, Tennessee, where a portion of the shop is devoted to restorations and custom work. Danny was in charge of applying the Lemon Twist Yellow, while the author handled the color sanding and buffing duties. When all the panels were painted, we started sanding the materials with 1,200-grit sandpaper, eventually finishing it with 2,000-grit before buffing it to a shine. As it turned out, we cut through the clearcoat in a couple of areas, which is relatively common when you’re planning to make a car super slick.
There’s no way around repainting the panel if you’ve cut through, so we faced facts and sanded the entire quarter panel in preparation for a spot-in. With this car, and most muscle cars, there aren’t many breaking points, especially where the quarter panel meets the roof skin. Luckily, this car will be receiving a vinyl top, so “burning in” the edge isn’t so important. Burning in the clear means spraying urethane reducer over the area where you want the new clear to blend in with the existing clearcoat. This will give the burned-in area a “dry spray” look, but sanding and buffing usually take care of it.
When spotting in a quarter panel, it’s a good idea to have a roll of 3M 2-inch tape handy, because it’s used to create a soft edge, rather than a hard tape line. To do this, fold the tape in half with the sticky side out, making sure not to actually crease the tape. This rolled edge will allow the materials to flow out a little more, leaving behind a much smaller tape line. Some areas can be taped off normally, like the wheel openings, since stainless steel moldings will be installed later.
If you plan to tackle any sort of bodywork or paint repair at home, be sure to wear the correct attire and keep a respirator handy at all times. Bear in mind that anything can happen with paint work, and be prepared to repair a mistake somewhere along the way, if you plan on doing this work frequently. Check out the photos as we repair a mistake of our own and make the most of this Hemi Cuda.
After the Barracuda’s body was painted, we rolled it outside and started the sanding and buffing process. Unfortunately, we cut through the clearcoat, leaving us with two options: paint the entire body again, or spot-in the quarter panel.
We decided to spot in the quarter panel, so the entire area was sanded with 800-grit paper, and cleaned with wax and grease remover. The damage might not be very noticeable, but it needs to be repaired.
It’s very important to stay off the crowns and sharp edges when color sanding a fresh finish. Here’s the damaged area; while it’s only a faint line across the edge, it would stand out if it were buffed.
It’s very important to stay off the crowns and sharp edges when color sanding a fresh finish. Here’s the damaged area; while it’s only a faint line across the edge, it would stand out if it were buffed.
Rolling the tape like this creates a soft edge and allows the material to flow out, rather than build up on the hard tape line. We suggest using 3M 2-inch-wide tape for this method.
On this edge, we use the rolling technique to provide a soft edge around the rear window opening. We use smaller pieces of tape to hold down the folded edge and keep it away from the quarter panel. This also keeps the tape from creasing.
For the quarter glasses, we simply tape on the backside, since there will be trim that resides on this small edge. The old masking paper is from the first paint job, so we’ll add fresh paper to the spot-in area.
We use the rolling technique on the door jamb, staying about 1/8-inch off the edge, to keep the materials from building up on the edge. Since this is curved, it’s a good idea to mask it off in sections, rather than trying to do it with one long piece.
The rocker panel is flat, so the 2-inch tape can be stretched from one end to the other. Some cars have a seam between the quarter panel and rocker panel, but this Barracuda did not, so we’re repainting the rocker, too.
Just like the other panels, we roll the tape back and use smaller pieces to keep it pulled tight. With enough practice, this technique will come naturally, but it’s a little tricky at first, so be patient.
There’s an edge on this Barracuda that we’ll use as a breaking point, and it will receive the roll-back taping treatment. By doing this, we can avoid painting the very bottom of the rocker panel and the pinch-weld seam.
It’s back to normal masking for the wheel openings since this car will be fit with stainless steel moldings. Before the moldings are installed we will sand off the tape line and buff it, so the spot-in will be undetectable, even with the moldings removed.
The bottom of the quarter panel, behind the rear wheel features a small, flat area, which is a nice breaking point. We let the tape overhang, and then roll it back to make our soft edge.
Out back, we can tape the rear valance panel in traditional fashion, and continue taping around the rear bumper inset and the taillight panel. All of this will be taped normally, since there is a breaking point.
Now that we’ve masked the outline of the quarter panel, we can use paper to protect the finished areas of the car. We’ll allow the paper on the bottom of the rocker panel to lie on the floor of the spray booth.
This car has junk wheels on it, used only to roll around on while the bodywork and paint are completed, so we’re not worried about getting a little overspray on them. The main goal here is to keep trash to a minimum.
The taillight panel and rear bumper area can now be papered, and we plan to run three sheets of paper across the rear of the car to protect it from overspray.
With the quarter panel taped and ready, one of the last steps is to wipe the area with wax and grease remover. Once this is allowed to dry, we’ll go over the panel (and the tape) with a tack cloth to remove any debris.
Since Danny Parton painted it the first time, he gets to help with the repairs and blasts on the yellow basecoat. Danny paints the entire panel to ensure uniform coverage and goes back for another coat after allowing a 10-minute flash time.
It’s time for clear, and he’ll soak the quarter panel and rocker panel with three medium coats, so there won’t be as much of a chance of sanding through this time. After the third coat is applied, the car is baked for 45 minutes.
The day after painting it we started the sanding and buffing process yet again and had wonderful results. It’s a shame we had to go through additional work, but it’s part of the job, and no one will ever notice, unless they read this magazine, of course.