Bigger, Better Binders: Upgrading to Big Four-Wheel Disc Brakes With Baer
Text by Harley Camilleri and Photos by Travis Noack
Bigger, Better Binders: Upgrading to Big Four-Wheel Disc Brakes With Baer
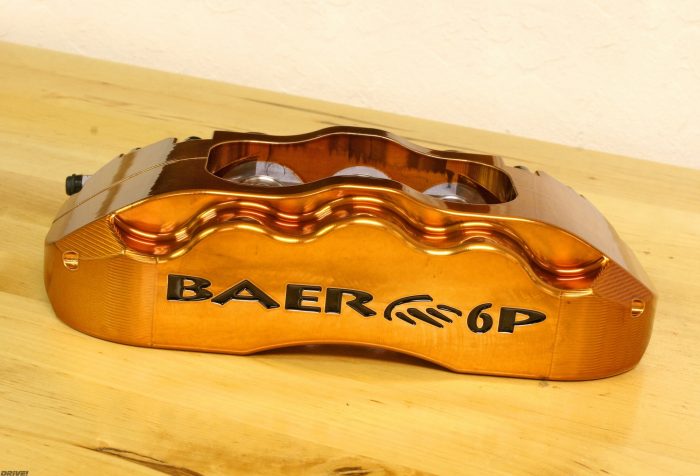
Let’s face it, early cars with a quartet of drum brakes could never be construed as performance vehicles. It takes much more than a powerful engine under the hood to call anything “performance.” Even if the drums were well adjusted it was still a harrowing experience bringing a speeding muscle car down to a stop. After a while the factories sought the magical world of better brake performance and upgraded to front disc brakes. Most weren’t vented and posed their own set of problems, but they were a big leap in overall ability to stop. Currently, the aftermarket has parts to transform most any early muscle car platform into a truly modern and capably handling machine. Brake systems have come even farther. Enter Baer Brakes and the company’s Extreme Plus 14-inch rotors and six-piston calipers. Stopping power? Got it in huge quantities.
Brad Fanshaw of Bonspeed wheels was in the process of finishing his ’71 GMC Sprint and planned on running it at some race events and on cross-country trips, and he generally wanted to enjoy the big-block power under hood without getting himself into too much trouble. The car was no slouch in the power department with a full Hotchkis suspension under the A-body, but Brad knew his car needed a brake system that would be able to keep up with his heavy right foot. Baer Brakes came to the rescue with its Extreme Plus front and rear system. Getting a set of wheels to fit would be no problem since that was Brad’s forte, but the rest of us should plan accordingly, because these big drilled and slotted rotors won’t be hiding behind anything short of a properly spaced 18-inch hoop.

Not only were the puny front disc brakes barely adequate for a stock car, they were completely overwhelmed by the built big-block. Adding plus-sized wheels and tires was not helping the issue. We wasted no time in breaking the bolts loose holding the caliper in place.

We followed up by pulling the spring clip from the brake line tab and disconnecting the flexible line from the hard line.

Although we won’t need them, somebody may want these paperweights, so we set them aside for safekeeping.

After popping off the dust cap, the retaining nut was spun free, allowing the whole rotor and bearing assembly to be removed.

The steering arm was busted free from the spindle with the help of an air impact gun.

The caliper adapter brackets won’t be used with the new monoblock-style calipers, so they were unceremoniously taken off and set aside with the rest of the inadequate parts.

Following Baer’s instructions, both lower holes on the spindle were drilled out to accommodate the new caliper adapter.

Once drilled to 1/2-inch, we mounted the Baer bracket and steering arm together and cinched them down tightly to 85 lb-ft.

Baer’s kit comes with a mini hub that allows the rotor to be a floating design. It was attached to the spindle with new bearings, retaining hardware and dust cap.

If we were running smaller brakes, this radial-mount bracket would not be necessary. Normal calipers mount across the caliper’s body, while this radial-mount piece allows the larger six-piston caliper to mount through the top of calipers. This mounting style places all the tension on the thick bracket and not on the softer, aluminum caliper body.

With the hardware installed, the bolts were locked down to 110 lb-ft.

These larger 14-inch rotors will be a big improvement over smaller rotors twofold. First, they will dissipate braking heat much faster due to the increased surface area. Secondly, the slots and cross drilling will allow the gas buildup between the pads and rotors to ventilate much faster.

Placing the caliper onto the radial bracket, we first measured to ensure the caliper was centered over the rotor. Using a caliper and feeler gauges, we set the center then clamped the hardware to 85 lb-ft.

Performance brake systems require better hoses, too. The braided stainless steel flex line was mated to the caliper with fresh copper crush washers. After the factory hard line was mated, we snuck the spring clip onto the bracket holding the assembly in position.

Not only is this a great-looking system, it will perform repeatedly under track conditions or tooling around town.

Not to be outdone, the rear axle was going to see an even greater transformation. Under the Sprint was a Currie-fabricated 9-inch rear axle that was originally fit with drum brakes. We started by slipping the axle shafts free from the housing.

Removing the rear drum brake assemblies required unclipping the emergency brake cables before loosening the hardware holding the backing plate to the axle flange.

The axles were slid back into the rearend housing and Baer’s backing plate with internal emergency brake was placed between the shaft and housing flanges.

Shoes for the emergency brake system were dropped into position and mounted according the instructions. Having these components may seem odd to some, but trusting the transmission to hold the vehicle in place on an incline is a recipe for trouble.

Since the rear brakes will be a matching 14 inches, it was necessary to torque an additional pair of radial caliper brackets to the rear axle.

Dutch wasted no time and slipped the Baer Extreme rotors over the wheel studs.

Following the same procedure as the front, the caliper was measured for center before being tightened to 85 lb-ft and filled with fresh performance brake pads.

Our fabricated rear axle housing required a minor redesign of the hard line before the braided stainless flex hose could be mated to it.

Finished up and looking fantastic, the rear axle had all of the same components as the front for extreme use or just getting groceries. We bled the brakes before heading out for a test drive to break in the new pads.
A bit more goes into converting the front, rear or both ends of your muscle car to disc brakes. The main component to contend with is the brake master cylinder or proportioning valve, depending on your car’s arrangement. Many companies have the conversion parts to make your brake system work correctly when changing from drum to disc brakes. In this case, Brad Fanshaw, the Sprint’s owner, chose to set up this two-tone A-body with a hydroboost system from Classic Performance Products (CPP). To maintain peak braking power and proper bias, your ride will need to be addressed according to the amount of changes you make. A little planning goes a long way before you start tearing everything apart and find out your combination does not work as intended.
Baer
602.233.1411
Baer.com